Thursday, July 28, 2011

TOOL #11: Self Assessing and Reflecting

1. What are your favorite tools you now have in your personal technology toolbox? Briefly describe a particular activity that you will plan for your students using at least one of these new tools.
There are so many great tools with many in the works for the upcoming school year.  I would say glogster will be a focus for me, as well as wallwisher and google docs.  The google doc form feature is pretty cool and very simple to use.  Edmodo and grouply are also wonderful tools to increase student communication and increase the technology experience. 


2. How have you transformed your thinking about the learning that will take place in your classroom? How has your vision for your classroom changed? Are you going to need to make any changes to your classroom to accommodate the 21st Century learner?  I think I am more energized and excited about planning and teaching this year - with the number of teachers on campus that are making this same leap of faith, I find it exciting to think about how all our students will grow and learn in this new way.  As for changes in the classroom, there will be some staging that needs to take place - a sort of setup that allows for students to move about in stations, develop common practices that incorporate different aspects of their instruction and learning.

3. Were there any unexpected outcomes from this program that surprised you?
I'm not sure it was surprising, but the number of tools available is amazing.  There are so many things to use and incorporate that the focus needs to be just that.....a focus of a few things to get the students (and teachers) on board before the process starts to expand and grow.


I am glad I had the chance to participate in this introduction to what new things are out there for us as educators and for our students.  A followup during the year or small additional tool activities along the way would be great to keep things fresh and remind us of the current excitement we have at this time.  Once things get going, it's too easy to fall into bad habits and old routines.
THANKS!!!  see you next summer!!

Tool #10: Underneath it All - Digital Citizenship

1. Discuss at least three things you would want to make sure your students understand about being good digital citizens.  
    *  With the age of students I teach, an important tool to share is that of appropriate communication.  The selection of words, use of pictures and the direction of their conversations is sometimes not ideal.  Add to that poor choice the fact that it will now be visible to all their peers and teachers on shared websites, they will need direction on what is allowed to be put in print for all to see.
    *  As students are held responsible for researching and completing assignments, discussions need to be had that encourage them to "consider the source".  What they find and where it is found should be verified and cross-referenced for accuracy.
    *  Online safety is an important aspect of being good digital citizens - students too often are willing to share their locker combination with their best friend, only to find their possessions have been removed.  The importance of keeping security information will be reinforced......this carries over to website passwords and login credentials.  Students should NOT share their information to allow anyone else to access sites to which they have individual rights.
2. Share at least one of the resources mentioned above or on the Ed Tech website that you plan to use instructionally......and......
3. Explain briefly how you would "teach" the idea of digital citizenship to your students.
    * The easy and quick way to share with students is always Brainpop.  The videos shared on this site are on their level, quick and to the point. I also liked the NetSmartz site - videos like "Miketosis" are easy ways to show students the result of poor digital citizenship.
4. Explain briefly how you plan to share the idea of digital citizenship with your parents.
    *  One tool would be to use the NetSmartz workshop link.  There are some presentations that would be helpful for adults.  I will be making a page on my classroom blog designed just for parents, and can include this information there. 
    *  Not all parents have access, or time, to use the internet.  For all parents, flyers will be shared explaining safe practices and expectations regarding school-related use.
    *  As mentioned on a few other blogs, parent night is a good opportunity to share information with parents regarding important points to consider regarding digital citizenship.  The number of parents I have for parent night is minimal, so this is not the direction I can rely on, but it at least provides an opportunity for face-to-face discussions should parents have questions.

.....AND I'M ALMOST DONE........!!!!!!

TOOLS COMBINED.......for the first day of school

After a few days of blogging, learning about new devices and tools, I have decided what I will do our first day back.  I'd like to introduce students and parents to our blog right away. In addition, I want to engage students in what I hope will be a common practice of stations with independent accountability. 

STATION ONE: (independent station)
Students will visit the class blog and complete the personal survey. Click on the picture to test the survey.


STATION TWO: (teacher directed station /white board)
Pass out and explain interactive journals.  Use the video below to help students understand the basic setup.


STATION THREE: (teacher directed station)
Go over "first day stuff", going over guidelines, required handouts, etc.

It's nothing fancy, but a start to introducing students to the use of the netbooks in addition to the class blog.
Time to wrap up the last two tools!!!

Wednesday, July 27, 2011

Tool #9: Incorporating Classroom-Based Devices as Tools for Learning

1. Why is it important to tie technology to the objective? This is important to keep students focused and give value to the use of technology. Students usually consider computers and internet activities as a means of entertainment.  Keep the objective in mind first then assign students a computer activity to keep them on target with what is hoped to be learned.

2. Why hold students accountable for the stations/centers?  This is necessary, especially in the beginning of the school year, to let students know they have a task to complete and this task will be checked for completion. Otherwise, a set of headphones or a computer screen turned away from view becomes a music and facebook activity.

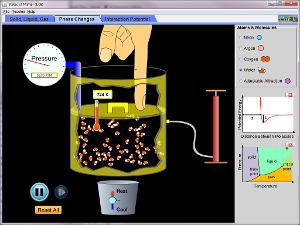
3. Two interactive links and how they could be used as stations.  LOVE LOVE the PhET site - this could easily be set up as traveling stations.  The site even allows you to embed the interactive to reinforce use of the blog to the students.
States of Matter
Click to Run

Position the 6 netbooks, have a different activity at each one, and partners have to travel between these 6 activities.  Our interactive notebooks are a great tool to use to monitor and track student accountability.  This can either be a free entry to show participation (better to allow this type of entry after the school year is underway and students are aware of teacher expectations) or there can be a guided outline which students are required to complete.  There could also be some preset blog questions or Grouply entries that students are asked to complete at each station.
Simultaneously, students can use the macbooks to log in to Grouply to update their daily blog, posting observations while creating their question-of-the-day for classmates to complete.

The second link that I found interesting was Interactivate.  This has many additional activities that hit on specific topics and reinforce key objectives.

4. iPad apps for the classroom stations: GoSkyWatch is very cool.  Shows realtime placement of stars and planets, which would be very useful during our astronomy unit.  Students could be assigned a specific constellation or planet and would have report it's position at the time at which they are viewing.  The NASA app also has great aspects - allows students to see planetary data, track movements and more.

5. Other ways to use the iPad as a station - there are many interactive sites which could be easily implemented.  QUIA, GIZMO and independent Brainpop activities are just a few.  The apps that would be relevant to each particular topic are numerous.  The key will be making these relevant as well as having a way to keep the student accountable for their participation.

With regards to Sir Ken Robinson.......there is no doubt - we DO need to change what we do to fit the needs of our current students.....not only is the overall culture different today than when I started teaching a large number of years ago, but that culture is forming a different student, and bringing a completely new cherub to the classroom than those who we taught using methods which worked so many years ago.
       It wasn't an all bad way to teach. . . we were teaching from a blackboard, with students frantically copying notes and completing an array of handouts . . . but then again, a 13 channel TV with a turn knob to change channels and two wires to increase reception was not an all bad way to be entertained.  And yet we have easily welcomed our entertainment change, with no one complaining about having to leave the large console behind as they move to the flat screen, HDTV which provides hundreds of channels that can be changed from a sitting position and occasionally supports a set of glasses that makes the screen come right to you.  I find it interesting how we as teachers sometimes have difficulty leaving behind our chalk and erasers to move to something that is new and effective to help our students become more successful.

....AND FOR SOMETHING A LITTLE DIFFERENT......

RAIN MAYBE??????

Tool #8: Taking a Look at the Tools

THINGS LEARNED:
* The netbooks are something we used frequently last year, but we did not access the camera capabilities. It was good to see how to access this and ways to incorporate this use in the classroom.
* As for the iPad, knowing what Apps are allowed and how to obtain those for student use is very helpful. The use of the iPad in class will be very exciting - this is something new for many of our students and will definitely keep their attention.

MANAGING THE DEVICES:
As for managing the devices.....I will have two iPads, 6 netbooks, and 4 Macs.
The netbooks will be numbered and assigned to specific students. These will be rotated between the students assigned to each. I am hoping this will allow me to be better monitor who has used and who has accessed information on each computer.....just in case there is a need to track student use.
As of today (and this may change as soon as the first day of school ends) I am planning to set up the Macs to be a full time station. As with lab activities, groups or individuals will rotate to these Macbooks to complete a specific activity. Having done this in summer school, we found the easiest thing to do was have these logged in already to save students time when they arrive at these computers.


With just two iPads, I am still considering the best way to manage and use these within a lesson. There will be the convenient days where a fellow teacher is not using theirs, which would then allow us to consolidate two or four more, providing another means of access for student groups.

I will also be purchasing a vga connector to project several of the apps for classroom presentation.

The overall idea will be to number & label all devices, monitor their use regularly, return and plug in everything BEFORE the students are ready to move to their next class, and make the students responsible for the technology. . . . and make the students active in the use of these devices to increase their comfort level and make them more efficient with their use.

Tool #7: Going Global - Online Digital Projects

I have created an Edmodo account for the purposes of this tool. After reviewing the links at "The Flat Classroom" site, I felt this one would be most manageable for our needs. The url for this will follow the same url as the blog and grouply - check it out (and I do need to add LOTS but it's a start)

I would like to propose two ideas:
1st - create a project that would connect the other classes with whom we are teamed at Spring Oaks Middle School. This next year, that will be a new direction for us so I think this would be a way to immediately get the students on board with that mindset as well as the teachers. Initially, the first "project" could be a means to connect with each other, learn about teammates (students as well as teachers) and then add new activities as the teachers begin planning together

2nd - create a project to team with Ms. Spicer's high school students at Spring Woods HS. The initial project would be the same.....connect with the class to which our students are assigned and learn about each other. As we begin new topics or units, the high school students could serve as peer tutors as well as provide activities and direction.

Tuesday, July 26, 2011

Tool #6: Using Web Tools to Promote Discussion in and out of the Classroom

OK - this tool has too many to comment on, but here goes.....

Wallwisher - very cool and something that could easily be used as an exit ticket for a daily question or a post as a student travels between stations. Students could even be allowed to create walls of their own for classmates to post on as part of an assignment


Voice Thread - this seems like a fun way for kids to get involved with a classroom project. I played with this a little, but am not one to like my own voice to be recorded. I don't think out students have that same problem ;o) I found a thread created by a teacher regarding safety - this can be used to model for the students what a product might look like to give them ideas and guidance.

Grouply - I learned about this site this summer when teaching summer school. The high school teachers at Spring Woods use this and the kids were very engaged, very involved and had no problem catching on to how to manage the site. Once members are invited to participate, they have the opportunity to chat, record messages, post remarks and more. I have just started to work with this, so the product below is far from impressive. I am anxious to see how it develops during the new year and if it is something that will work well with our blog.

Any of these tools as well as the others are great for students that might otherwise be hesitant to speak out in class. Posting a remark with the comfort of time to revise and review comments may be more appealing to some students - in addition, they LOVE to text and post on Facebook. This may be a way to get them interested by allowing activities they already love to do.

Tool #5: Producing with Web 2.0 Tools


Glogster is a very fun way for students to pull together bits of research or information and present what they are trying to share, whether it is with the teacher or the class. Our campus has a membership, and this is one of those tools that was easy to fall back on regardless of what the lesson was. This compares to, but takes the place of, making posters which often need to be thrown away and started over as mistakes happen. There is nothing more to do here than to click and delete, retype misspellings, or to change colors if the product is not as the student hoped. It also takes it a step further, allowing videos to be embedded in the glogster as well as active links to areas that were discovered in researching the assignment.
http://sciencerocks8thgrade.blogspot.com/is the link to our class blog. This plays many roles in our daily activity.....whether it is to post in a familiar site the daily assignment or if it is used to provide students quick links to avoid typing & retyping lengthy url's.......

Wordle is a fun way to have students take key words from their unit and create an image that connects all the words, overlaps ideas that are repeated, and then allows them to save the created wordle as a jpg. Once this is done, the jpg can be placed in a document, followed by having students hyperlink each word to its definition.

Tool #4: Moving Up to the Clouds

Using Google documents in class will be a new focus for the 2011 - 2012 school year. I am placing a form here on this post to actually see if this method of using a Google App will work better than the advised way of sending the link. When I created the form the first time and tried to share it, I was not getting the desired result.

SOOOOOO......any of you that might view this page, please enter your answers and hit submit. I'll see what happens and continue to practice with other Google documents and ways in which sharing will be helpful in the classroom.

For our team and peer communication, this is very helpful in tracking and monitoring data. We used a spreadsheet last year when we implemented the "ICU" program to assist students with their homework. At the end of the year, we also used this to compare and determine awards we were planning to give students for the end-of-the-year awards ceremony. Through the use of a word document, planning and building a unit could be easily managed.....as each team member researches and finds activities or ideas for the topics, these could be added to a shared document. As we each create our own documents, these too could be posted for other teachers to access.
PLEASE FILL OUT THE FORM BELOW AND I'LL GET BACK TO YOU ALL WITH THE RESULTS

Tool #3: Finding Online Video and Image Resources

There are an unbelievable number of sites that provide streaming which can be accessed for classroom use as well as planning. YouTube is always a preferred favorite, as well as United Streaming, Discovery Channel and the History Channel. There are many wonderful videos on Netflix, but the district currently has that blocked from in-school use.


B '354/1000 O Scrabble White Letter on Green G
Flickr has a fun link for using images to spell words or titles which can be used on webpages and blogs. The site is http://metaatem.net/words and can be very fun to play with. I've used this on our family blog to post names of a family member who might be highlighted in that blogs' post.

Adding video clips is a nice touch to a blog or webpage. It gives an added "entertainment" that will keep the interest of the student and often be very helpful to provide added information for whatever the post may be trying to share.

The video above as well as the following "Bill Nye" clip are just two examples of what can be incorporated within a blog, used as a classroom warmup, or something with which to conclude a day's lesson.


Web Albums are useful when trying to give an assorted viewing of a concept. We kept a web album running last year in the right panel that would scroll through a collection of volcanoes. This was interesting for the students to see a continually changing collection of images that related to what we were talking about.

Tool #2: Building Community in the Online Environment

Tool 2 complete - I have visited several blogs of peers and was very impressed. Not just with what they have but with how far they have moved through the tools of this class.

Having used a blog in class last year, the process is pretty easy and also very similar to facebook or other types of social networking. I am very comfortable sharing thoughts on the blog - for my classroom blog, I did engage the "moderate comments" feature. I never had an issue with a student's comments but decided it was better to be safe......this allows the kids to give their feedback, but requires me to select a button before allowing the comments to be visible publicly.

The "Technology Integration in Education" site seems interesting. There is a large source of sites and information from which to pull so I will be accessing that frequently as I begin planning for the new school year. I also have set up an account on Diigo and would like to explore how this can be utilized. I'm thinking of ways to incorporate this in teaching, but also for team planning and collaboration with our team.

Wednesday, July 20, 2011

Tool #1: Getting Started

It's July 20th and I've realized I need to get a move on this 11 tools thing!!
Having said that, the blog is created (I cheated and used mine from the previous classes) but I did create a new avatar.

Requested post: was it easy, were there challenges???.....easy to do and a tool to continue using this upcoming school year. Time to move on to the next tool.

Thursday, July 7, 2011

Time for another set of Tools!!!!

Let's Make a Difference - let's make it fun!!!

We do make a difference....
I love my job ;o)